Standing Waves in Chladni Plates
Activity


Summary: Students make different standing wave patterns on hand-bowed Chladni plates. Students record their observations and analyze them.
Time: 40-60 minutes. The time is adjustable. Students make as many Chladni patterns as time allows.
Ages: 8 to 16. All ages will have fun making the patterns. All students can analyze their observations, but students at higher grade levels can analyze more deeply.
Number of students: 1 to 24. I recommend using a total of 1 to 4 Chladni plates with 2 to 6 students per Chladni plate. With more students and more plates, it may be too noisy.
Noise advisory: The noise will annoy everyone in nearby rooms! This activity is best done at a time and location where there is nobody in nearby rooms.
Materials and Preparation
Hand-bowed Plates versus Speaker-driven Plates
For this introduction to standing waves in plates we will use plates that are bowed by hand (like a violin) rather than plates that are driven with a speaker. This is a hands-on activity, literally hands-on! Students will cause the vibration in the plate using a hand bow and they will push on the plate with their fingers to stop the vibration at particular spots. The best way to understand the physics is to have a good feel (literally!) for where the plate is vibrating and where it is not vibrating. With a hand-bowed plate, students get this direct experience. Students will not get the same hands-on experience with a speaker-driven plate; the speaker-driven patterns appear as if by magic using invisible electronic technology. On the other hand, there are other good reasons to use speaker-driven plates, namely, you can make many more fantastically intricate patterns with the precise frequency control of an electronic speaker. But this activity for beginners will use only hand-bowed plates.
Noise Preparations
Bowing the Chladni plates makes loud high-pitched ringing or screeching noises, like a screechy violin.
The noise will annoy everyone in nearby rooms. This activity is best done at a time and location where there is nobody in nearby rooms. (The noise is less annoying to the participating students in the room because they can see the wonderful patterns produced by the sound.)
Some students participating in this activity may want to wear earplugs or earmuffs because the noise is annoying. The noise will not damage students' hearing.
The Chladni Plates
Make or buy Chladni plates, square and/or round. The number of plates depends on how many groups of students will be using the plates simultaneously. I recommend that each plate is used by a group of 2 to 6 students. For example, you'll need 4 plates if you have 4 groups of 6 students (24 students total).
Chladni plates can be many shapes, but the two basic shapes are a square and a circle. It's good to have both a square plate and a round plate because then you can make more patterns. A square plate is more versatile than a round plate. With a square plate, you can easily make a variety of interesting patterns. With a round plate, you can easily make simple star patterns, but it is harder to make other patterns. If you have only one plate, choose the square. If you have multiple plates, you may want equal numbers of square and round plates or more square than round plates.
I made my Chladni plates. Home-made things inspire students to make things themselves. I made my plates as follows.

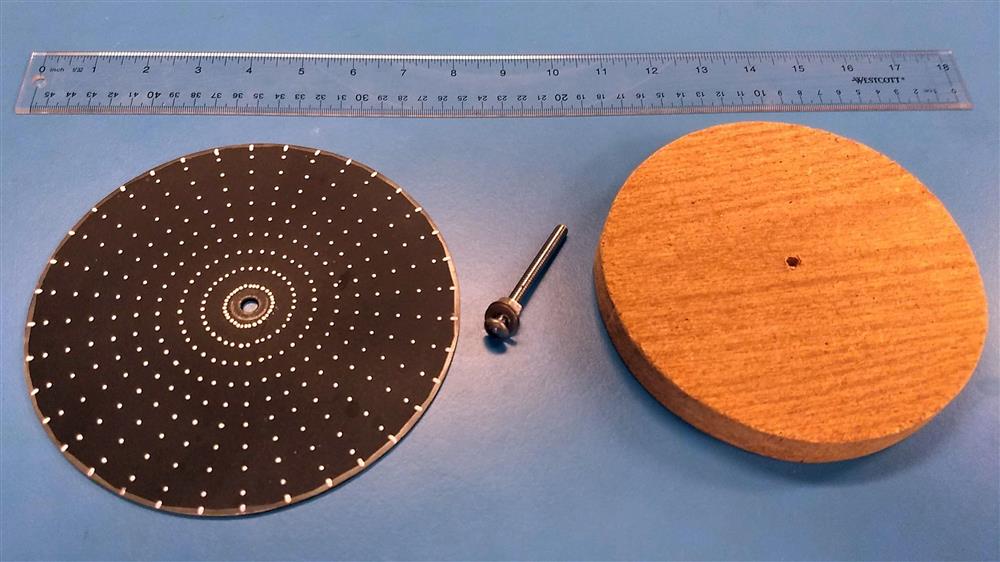
For the metal plates, the kind of metal and the size is not critical. You need a thin metal plate that is thick enough to be very stiff. I had a local metal shop cut the plates because I don't have the tools to cut steel plate. I used regular carbon steel. Thickness: 16 gauge (1/16 in, 0.06 in, 1.5 mm). Square side length: 6 in (15 cm). Circle diameter: 7 in (18 cm). Center hole diameter: 0.25 in (6 mm).
I spray painted the top side of each plate flat black so it would contrast with the white salt patterns. I used an opaque white paint pen to mark a grid of dots on each plate. These grids help the students record their observations on the observation sheets, which have matching grids. The square plate is marked with a square grid of 10 x 10 units. The round plate is marked with a radial grid, 10 radial rings and 36 angular sectors (10 degrees each). Grid templates: Grid template for square plate, Grid template for round plate.
The center post is just a long, strong bolt with a hex nut and two washers. I used a round-head machine screw. Size: 1/4"-20 x 2.5" (M6-1 x 60 mm).
The wooden base can be any shape. I cut both bases round with a jigsaw. The base should be a little smaller than the plate and thick enough to hold the bolt firmly. Drill a center hole all the way through with a diameter slighter smaller the bolt. Base diameter: 6 in (15 cm). Thickness: 3/4 in (2 cm).
Assembly: The plate is fastened under the head of the bolt with the two washers (above and below the plate) and the hex nut tightened with a wrench. The thread end of the bolt is then screwed all the way into the wooden base, so it is held very firmly.

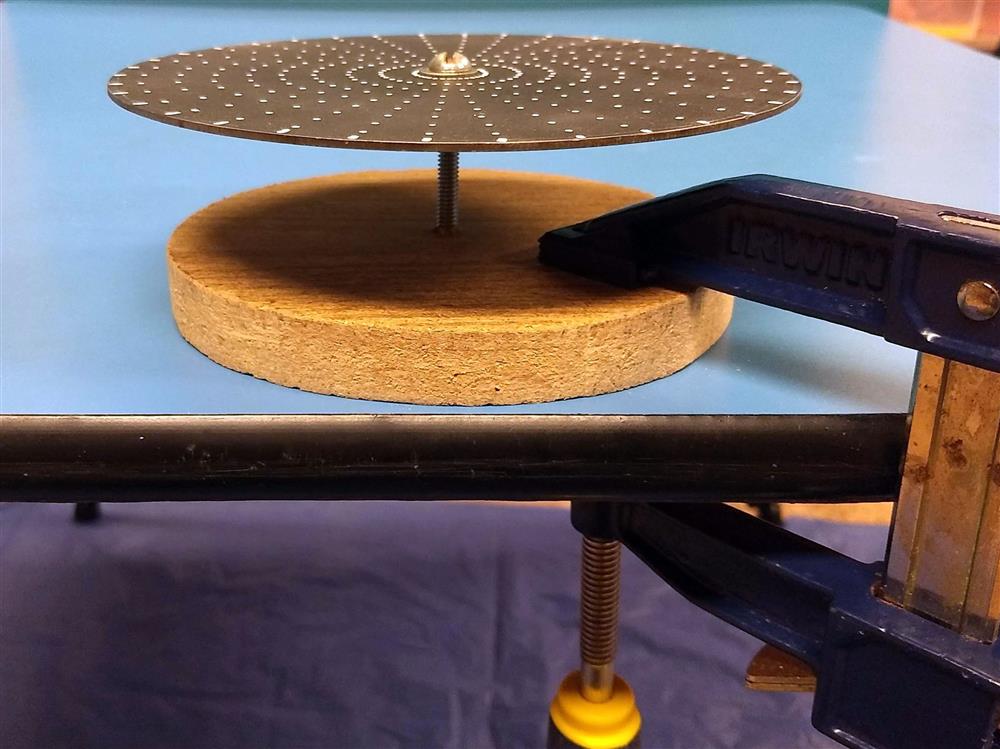
Clamp the base tightly to the tabletop, near the edge of the table where it can be bowed.
The Bows
Make or buy bows. You'll need one bow for each group of students. You only need one bow if you intend to demonstrate the plates one at a time.
You can buy a real violin bow with a ribbon of synthetic hair. This will work better than a hand-made bow, but you'll need to buy both the bow and replacement ribbons of hair.
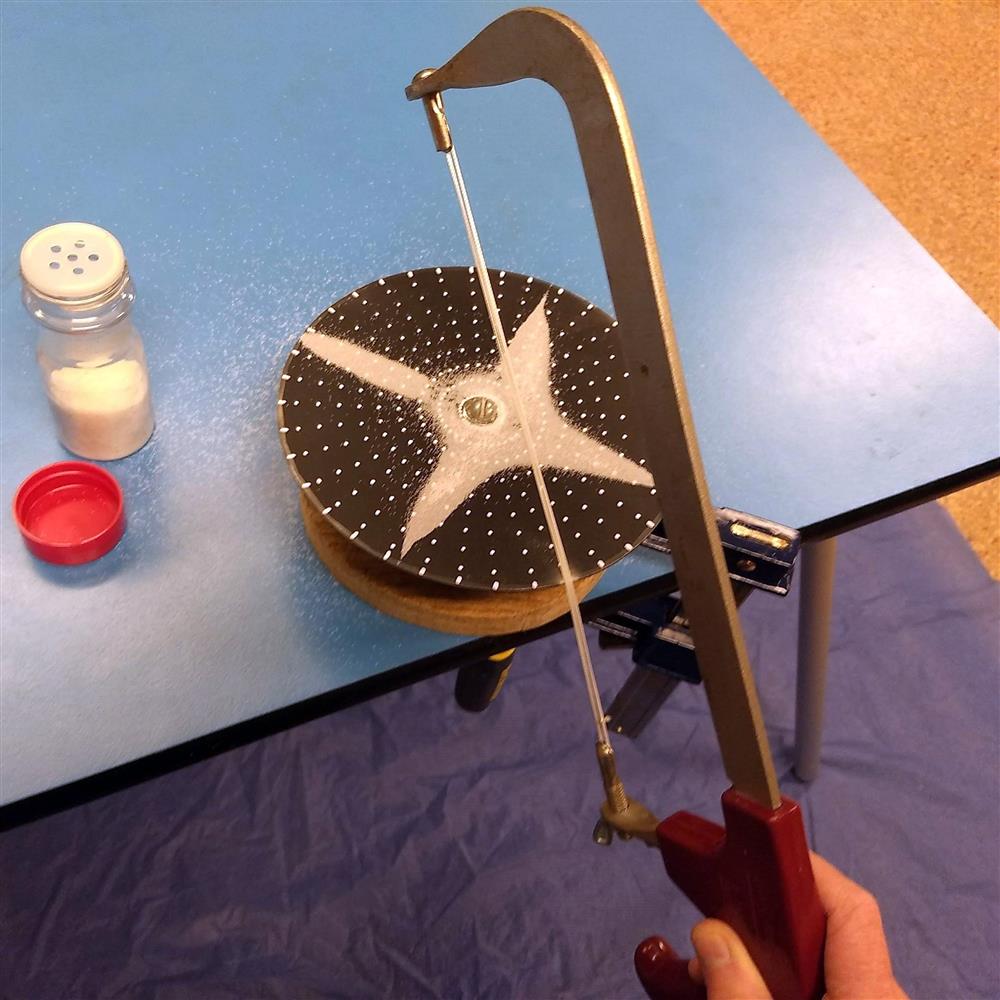
You can make a bow from stuff you may already have, a hacksaw and some kite string. Simply replace the hacksaw blade with string. Students using this bow will see that the vibration of the plate can be caused by a plain taut string (with rosin); it does not require any special technology in a musician's bow. A medium-size hacksaw with a 10-inch (250 mm) blade is long enough for a good bow stroke. I used the kind of hacksaw that has studs that fit into holes at the ends of the hacksaw blade.

Use kite string made of nylon or spectra, which is thin, strong, and smooth. A spool of kite string is inexpensive. Kite string will not work as well as the synthetic hair of a real violin bow, but it is less expensive.
Make a jig to help you make loops of string of the correct length. Start with a piece of wood a bit longer than a saw blade. Hammer two finish nails (with tiny heads) into the wood, spaced almost as far apart as the two attachment points in the hacksaw blade.
Cut a length of kite string a little more than six times the length of the saw blade. Wrap the string around the nails on the jig to make a triple loop and tie the ends together. Make many extra replacement loops beforehand so you can quickly replace broken strings during the activity. You can keep all the extra loops on the jig, so they don't get tangled.
To attach the string to the hacksaw bow, first loosen the tension by turning the wing nut. Then put the loop of string around the blade-mounting studs, with the knot where it will not touch the plate. Finally, tighten the tension by turning the wing nut. With this kind of hacksaw and a triple loop of string, three strings (not six) will touch the Chladni plate.
Rosin
You will need to buy or borrow some violin rosin. Rosin is a hard, sticky substance. The bow string will work much better with rosin. After tensioning the bow string rub the rosin onto the bow string.
Salt or Sand
You can use either salt or fine sand. They work equally well. I use salt because I always have salt. Salt may accelerate rusting of the metal plates, so you may prefer to use sand. Choose light-colored sand if your plates are dark-colored.
Fill one or more spice shaker bottles with the salt or sand. A spice shaker works better than a saltshaker because the holes are bigger.
Cleanup Supplies
The salt/sand will scatter all over the table and floor. You may want to put paper or plastic sheets on the floor. During the activity, use a brush and/or sheet of paper to sweep extra salt/sand from the table back into the shaker bottle. Afterward, you may need to sweep or vacuum the floor.
Practice Run
Before the activity, the teacher should practice making different Chladni patterns, more than just the simplest 4-pointed star pattern. The simplest patterns are easy to make but the more complex patterns are harder to make.
Observation Sheets
Before the activity, print out observation sheets for the students, about 6 to 8 small sheets per student. (Each printed sheet makes four small sheets.) Students will need one small observation sheet for every pattern they draw. Extra blank observation sheets should be available so students can discard mistakes and start over. The number of patterns the students are able to make and draw depends on how much time they have. Provide pencils with erasers.
Printable observation sheets: Observation sheets for square Chladni plates, Observation sheets for round Chladni plates.
Instructions for recording observations are below.
Other Visuals
You may want to print or prepare to display some other pictures of Chladni plates. In particular:
- Animation or diagram of Chladni plate (see below).
- Photos of sample Chladni patterns (see below).
Cameras (optional)
If the use of cameras is allowed, students may take photos of the patterns. But taking photos should not be used as a substitute for drawing the patterns by hand on the observation sheets.
Sound Meters (optional)
Optionally, for higher grade levels, the teacher may allow or require students to measure the frequency (pitch) of the ringing tones with a sound meter. This will enable students to perform a numerical analysis later. However, fiddling around with the sound meter may take extra time and distract students from observing the Chladni plates. There are many smartphone apps that measure sound frequencies. You should prepare ahead of time by choosing a sound meter app and learning how to operate it.
Activity
Students will make different standing wave patterns on Chladni plates. During the activity, they will record their observations (see below). At the end, they will analyze their results.
Making Chladni Patterns
Students will make several different standing wave patterns (called Chladni patterns or Chladni figures) on Chladni plates. Students should make as many patterns as time allows.
Divide into groups, one group for each Chladni plate, 2 to 6 students per group. In each group, one student uses the bow until they make a Chladni pattern. Another student can help by pressing their fingers on the plate. Others observe. Students record observations on the observation sheets (see below).

Preparation for bowing:
- Make sure the plate, post, and base assembly is tight and stiff. Make sure the base is clamped tightly to the table.
- Tighten the tension on the bow string by turning the wing nut. Re-tighten whenever the string becomes slack.
- Rub rosin on the bow string whenever you put a new string on the bow. Rub more rosin on the string whenever you feel it is not sticky enough.
- Whenever the string breaks, replace the string with a new string, tighten it, and rub it with rosin.
Bowing the plate:
- Sprinkle salt/sand evenly over the entire plate. When it becomes unevenly distributed, spread it around. Sprinkle more on the plate whenever you need more.
- Optionally: Press your fingertips onto the plate at one or two spots, hard enough to stop the vibration at those spots. A partner may do this. You may use the eraser end of a pencil instead of your fingertip. You can make some patterns without pressing on the plate at all. To make more patterns, press at one or two spots on the edge of the plate or on the surface of the plate.
- Bow the plate, up or down. Stroke the edge of the plate at a single spot, very steadily, slow or fast, gently but firmly, until you hear a tone (usually high-pitched). When you hear a clear tone, the salt/sand will jump into a pattern. You can make the pattern clearer if you can repeat the exact same tone, with the bow at the exact same place and your other fingers at the exact same places.


If you don't hear a clear tone and see a clear pattern, try bowing with a different speed or pressure or at a different location or move your finger to stop the vibration at a different location. Try producing tones with different pitches: low, medium, high, and extremely high.
If the noise annoys you too much, wear earplugs or earmuffs.
After making a pattern and recording it on the observation sheet, pass the bow to another student to make another pattern. Make and record as many patterns as time allows.
Sample Chladni Patterns
Here are some of the patterns you can make with square and round Chladni plates.

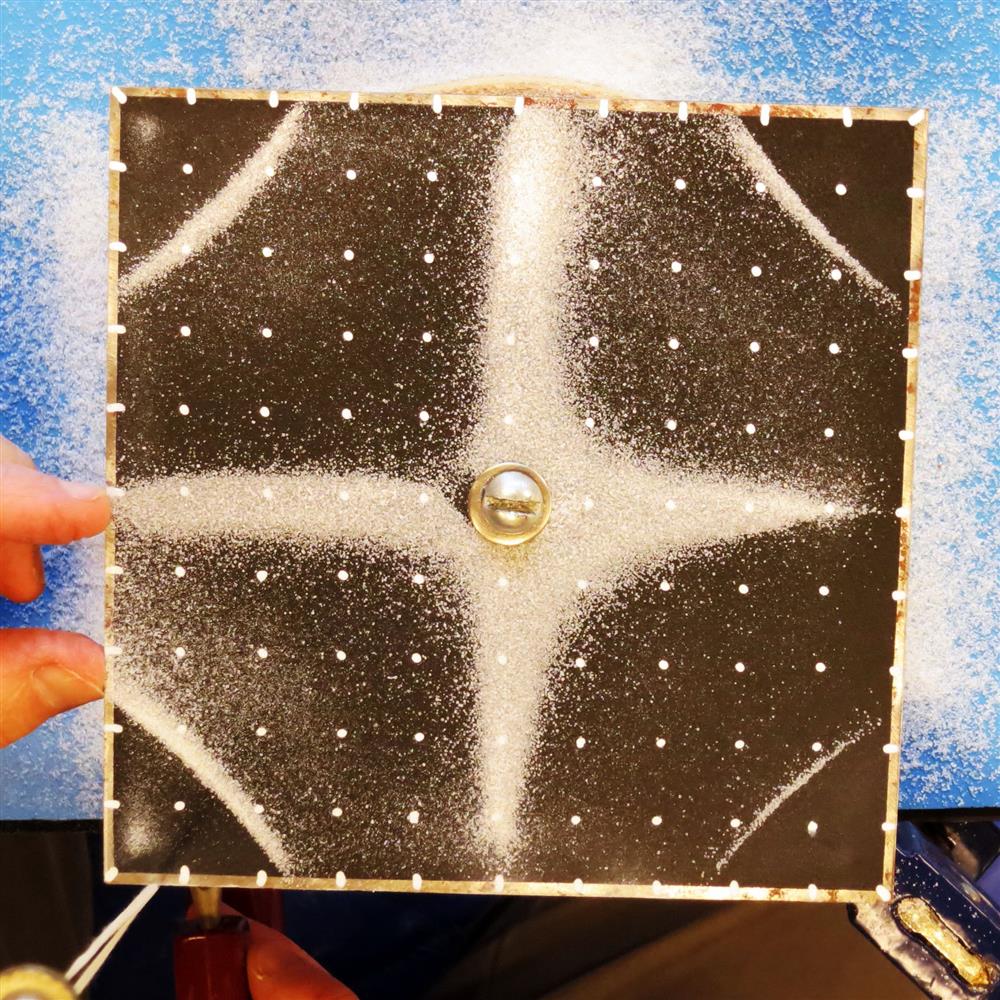
4-pointed star

8-pointed star


like pattern 4


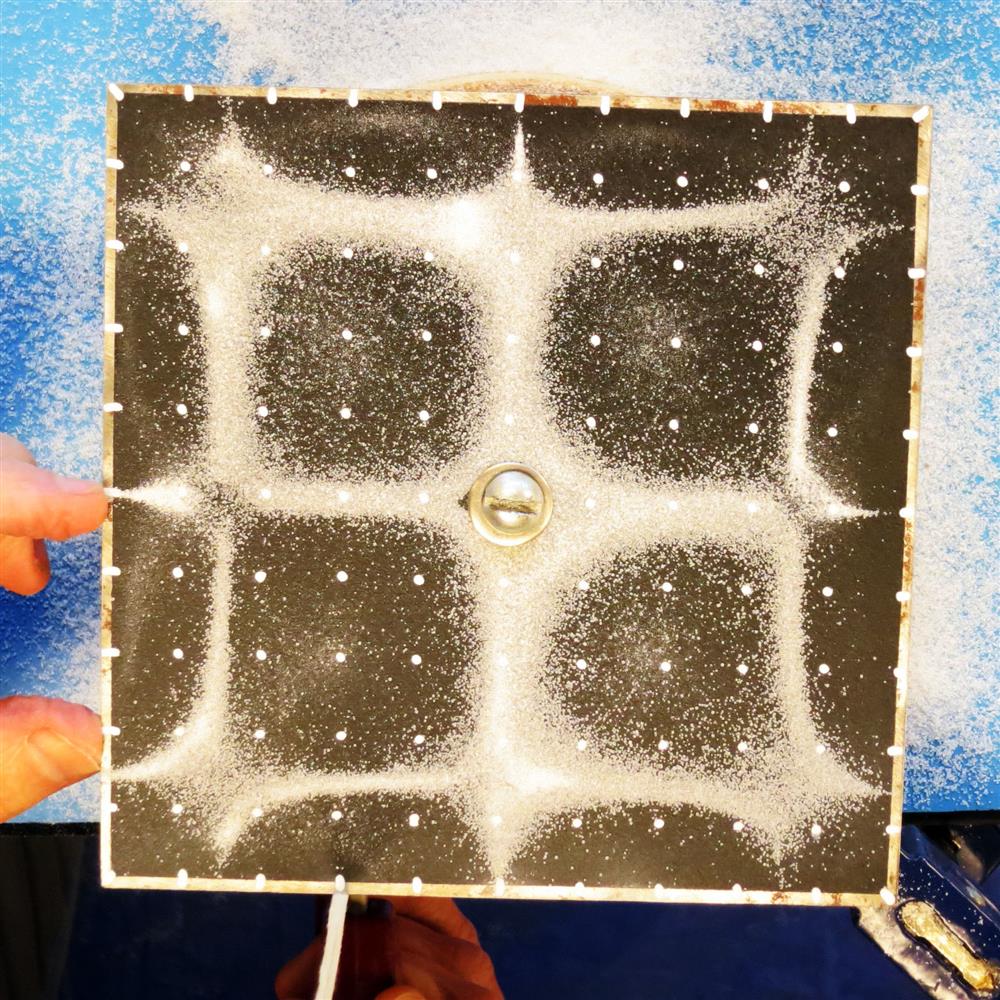

4-pointed star

6-pointed star

8-pointed star
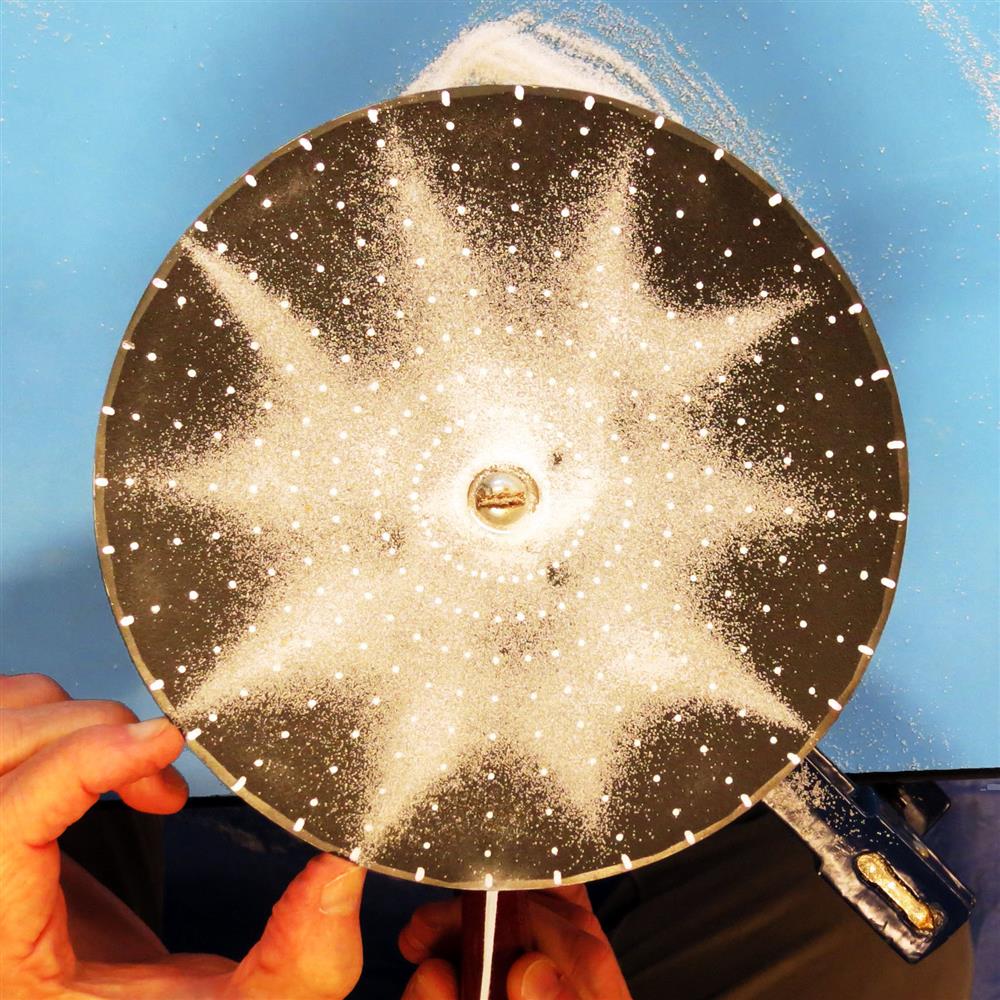
10-pointed star

There are more possible patterns that are not shown above.
Animation or Diagram
It's helpful to show this animation or diagram to the students, before or after they get their hands-on experience. In real life, you can feel but not directly see the vibrations in a Chladni plate. This animation shows a standing wave in a Chladni plate with exaggerated size and slower speed so you can see how the plate vibrates and how the nodal lines remain stationary. This works as an animation or as a printed still image. (Click to view separately.)
Observations
For each Chladni plate, one student bows the plate to make a pattern and the other students observe. Students record their observations on the observation sheets. The teacher may say whether students should record their observations individually or as a group.
Printable observation sheets: Observation sheets for square Chladni plates, Observation sheets for round Chladni plates.
Every time you make a new and clear Chladni pattern, record your observations. Note the exact positions of the bow string and fingers touching the plate. Listen to the sound. Feel the vibration. Examine the pattern of the salt/sand. Record the new pattern on the observation sheet. Instructions are on the sheet, as follows:
- Draw an arrow (→) where the bow string touches the edge of the plate and makes it vibrate.
- Draw big dots (•) where the plate is held still by your finger(s) or the center bolt.
- Sketch the pattern you see in the salt or sand.
- How high is the sound? ▢ low ▢ medium ▢ high ▢ very high
Here are some examples of observation sheets with pencil sketches of the observed Chladni patterns:
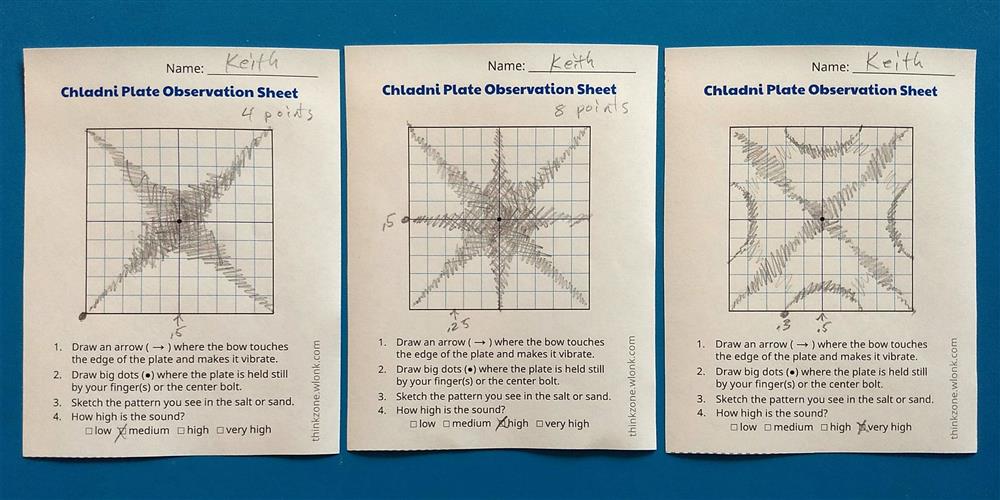
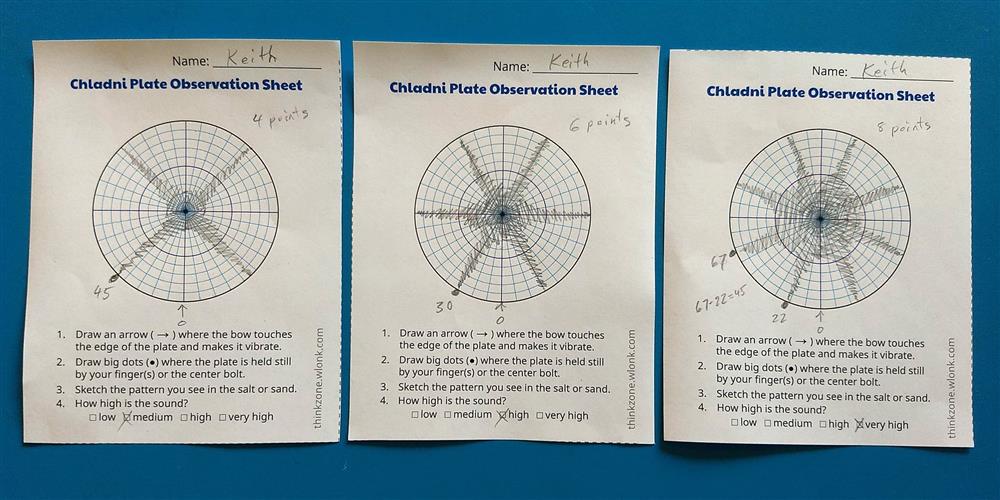
Students should sketch with pencil so they can erase mistakes.
If the use of cameras is allowed, students may take photos of the patterns. But taking photos should not be used as a substitute for drawing by hand on the observation sheets. Students should sketch the patterns by hand, either from life or from a photo. The act of drawing makes you observe more closely.
We expect younger students to make simple sketches. We expect older students to make more accurate sketches with more details.
We expect all students to draw the bow position (arrow) and finger positions (big dots). For higher grade levels, the teacher may suggest that students also write numeric distance units and angles next to the bow and finger positions (as shown in the samples above).
Optionally, for higher grade levels, the teacher may allow or require students to measure the frequency (pitch) of the ringing tones with a sound meter. This will enable students to perform a numerical analysis later. However, fiddling around with the sound meter may take extra time and distract students from observing the Chladni plates.
Analysis
After recording observations for as many patterns as time allows, the students gather, either in groups or as a whole class, and discuss what patterns they observed and what relationships they can discover. The teacher or students may write these observations and relationships on the board.
We expect the students to observe the following:
- The salt/sand moves away from the place where the plate is bowed, where it vibrates.
- The salt/sand collects at the places where the plate is held still by fingertips or by the center bolt.
- The salt/sand collects along lines that may be straight or curved and may be sharp or fuzzy. (These are the nodal lines.)
- The simpler patterns have lower-pitched tones, the more complex patterns have higher-pitched tones.
- The patterns are often symmetrical around the center, but sometimes asymmetrical.
If you have time, ask the students to compare standing waves in strings and standing waves in plates. What is the same and what is different? Students may express these comparisons:
- In both strings and plates, the standing waves vibrate without traveling along the string or across the plate
- In both strings and plates, there are stationary places in the standing wave, still points (nodes) in strings and still lines (nodal lines) in plates
- The string is a one-dimensional line, but the plate is a two-dimensional surface.
Vocabulary. By the end of the discussion, students should know these words:
- Chladni plate: a plate that vibrates with a standing wave pattern
- Chladni pattern (Chladni figure): the pattern made by the salt/sand on the vibrating plate
- Standing wave: a non-moving (stationary) wave
- Nodal line: a still (stationary) line, straight or curved, on a vibrating plate
For higher grade levels, the students may find more detailed or numerical relationships in the patterns. This may be a follow-up activity on another day. I'll just give two examples:
- For star patterns on a round plate, calculate the angles of the star points relative to the bowing point. For example, for the 8-pointed star pattern there are 45 degrees between star points and 22.5 degrees from the bowing point to first star point.
- If sound frequencies were measured, make an x-y scatter plot of the number of nodal lines versus sound frequency. Show that higher frequencies correlate with more nodal lines.