Making Kinegram Animations
You can make your own new kinegram animations if you are a skillful user of a computer drawing or painting application.
This explains the general principles of making kingegram animations, and then gives detailed instructions for how I did it with Adobe Illustrator.
Review: What is a Kinegram?
A kinegram has two parts: (1) an underlying picture with a complicated striped pattern and (2) an overlay of alternating solid and clear stripes on a sheet of clear plastic. When the overlay is moved up and down in front of the picture, you will see the motion, such as wheels turning or circles expanding and contracting.

(without overlay)
(with moving overlay)
(without overlay)
(with moving overlay)
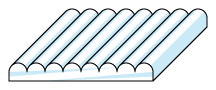
The kinegrams found on toys use a lenticular sheet instead of a striped overlay. This is a clear plastic sheet with parallel rounded ridges that act like lenses. The ridges are aligned horizontally and the motion effect is produced by tilting the kinegram back and forth. (Lenticular sheets can also be used for 3-D images, with the ridges aligned vertically so your left and right eyes see different images.)
Principles of Making Kinegram Animations
Step 1: Decide what to animate. It may be an abstract pattern, a cartoon, or a sequence of photos. Here are some hints about which kind of images work best:
- It's best to use bright, bold, high-contrast images with no small details.
This is because only thin slivers of the image are visible through the
striped overlay. Abstract shapes work better than cartoon characters.
Solid silhouettes work better than line drawings.
- It's best if the animation is cyclic, beginning and ending at the same
position. If it is not cyclic, there will be a jump each time the sequence
repeats. A person running in place works better than a person running
across the page.
- It's best if the animation makes sense both forward and backward as
you move the overlay back and forth. A person doing jumping jacks works
better than a person running.
- It's best if no part of the image moves too much between frames. If
each frame is similar to the previous frame, the ghosts from adjacent
frames are less noticeable. A person waving works well because the arm
moves only a short distance, but a person doing cartwheels does not work
well because the head, arms, and legs of the person move a long distance
around the entire circle.
- The easiest animations are made of rigid shapes that merely move, rotate, expand/contract, or change colors. These are easiest because you only need to draw the shapes once and then you can just move them around.
Step 2: Set your parameters.
- Decide on the animation cycle length: how many frames per cycle. For example: 12 frame cycle.
- Decide on the grid unit size: the thickness of one image slice. For example: grid unit = 0.5 point (1 point = 1/72 inch).
- Decide on the overall size of the images. For example: 4 inches high and wide.
- Decide whether the stripes will be horizontal or vertical. Here, I assume the stripes are horizontal.
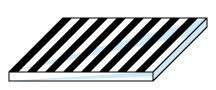
Step 3: Make an overlay. Print it on clear plastic, bigger than the image, with alternating horizontal solid and clear (transparent) stripes.
The distance, measured as the the number of grid units, from the top of one solid stripe to the top of the next solid stripe must be the same as the animation cycle length. The clear stripes should be thinner than the solid stripes. For example, for a 12 frame animation with a unit of 0.5 point, the overall spacing must be 12 units (6 pt). You could make the overlay be 33% clear, with clear stripes of 4 units (2 pt) and solid stripes of 8 units (4 pt) for a total of 12 units (6 pt). Or you could make the overlay be 50% clear, with equal-sized clear and solid stripes of 6 units (3 pt) each for a total of 12 units (6 pt). Either will work with the same kinegrams. Thinner clear stripes will make the kinegram appear sharper but dimmer; whereas thicker clear stripes will make the kinegram appear brighter but blurrier.
The color of the solid stripes may be any color that is opaque (not translucent). Black is the standard because it is very opaque. Black or dark-colored overlays look good if the kinegram background is dark. Opaque white or light-colored overlays look good if the kinegram background is light. Professional printing services can print opaque white or light colors on clear plastic.
Lenticular sheet. Alternatively, instead of printing a striped overlay, you can buy a lenticular plastic sheet. This will give a much brighter image than the striped overlay. Search online for "lenticular sheet", "lenticular screen", or "lenticular film". There are a lot of wholesalers, but only a few retailers. You can buy lenticular sheets with different pitches (such as 10, 20, 30, 40, 50, 60, 75, 100, 160, and 200 LPI). Lenticular sheet with about 50 LPI is typical for use with home printers. You may design your kinegram using any pitch, but you will need to print your kinegram at a scale that exactly matches the pitch of the lenticular sheet.
Step 4: Make the animation. Make one picture for each frame of the animation. For example, if you want an animation of a spoked wheel turning, make pictures of the wheel at different angles for each frame. If you want an animation of an animal running, make pictures of the animal at different points in its stride.
Step 5: Interlace the frames of the animation.
You may be able to buy or find free software to interlace the images. Some companies that sell lenticular sheet also sell the interlacing software. This explains how to do the interlacing yourself without special software. It takes patience.
Keep only thin horizontal slices from each frame. In other words, remove or mask out everything except these thin slices. Each slice is the thickness of the grid unit. The number of units from the top of one slice to the top of the next slice must be the same as the animation cycle length. You may want to create a striped clipping mask (not the same as the striped overlay) to apply to each frame.
For a 12-frame animation:
- from frame 1, keep slices 1, 13, 25, 37, ...
- from frame 2, keep slices 2, 14, ...
- from frame 3, keep slices 3, 15, ...
- ...
- from frame 12, keep slices 12, 24, ...
Combine the masked frames into the final kinegram pattern by interlacing the slices.


Step 6: View the kinegram. Print the kinegram on paper. Move the plastic overlay over the paper picture.
Making Kinegram Animations using Adobe Illustrator
This tutorial gives step-by-step instructions for making a kinegram animation using Adobe Illustrator version CS3 (2007):
The tutorial references these downloadable files: